

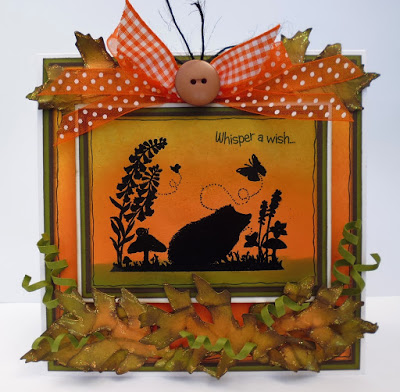
Good morning everyone - this week it's my turn (Helen N) to share the weekly blog project and I thought I'd make a card with some of the digital products from Little Claire.
You may not have seen the digital section on the website but there are digi image downloads, digi sentiments, digi decoupage and digi papers - have a look for the 'digi downloads' section on the index bar at the side of the website.
I've chosen to use one of the papers and two of the images from the section. You don't need to have any special software to use digi products - I created the strip across the front of the base of my card using Word. It's also easy to resize the images in Word - this is one of the great advantages of using digital products.
A few quick tips for using digital products -
1. I printed my digital paper by copying and pasting it into a Word document - if you set the page margins at zero the paper will cover almost the whole of an A4 sheet.
2. Make sure you print digital paper on good quality paper - I find normal copy paper too thin. I use a pearl paper to give a good finish and make it look more like a shop bought paper but you could also use decoupage paper.
3. If you find the outline is too feint on digi images, print in 'gray scale' (through your printer menu) to give a darker, more defined print.
4. If you can, leave your digi image for a little while before colouring it or use a heat gun on it - I find this avoids any 'bleeding' from the colouring. I also find it better to 'dot' colour with Promarkers to stop any colour bleeding over the lines.
Here's what I used to make my card:

6" square card blank
red card
foam pads
circle and scalloped circle dies
Promarkers - Poppy, Sandstone, Caramel, Pastel Blue, Denim Blue, Cool Grey 1 and 3
And here's what you need to do:
1. Print out the boat image twice - adjust the size to fit inside a circular die. Then print out the anchor, resize to about 2cm high and then copy and paste to make a row of anchors.
2. Die cut one of the boat images using a circle die and cut out the boat from the second image. Colour with Promarkers.

3. To make the base card, use the largest circle die on the folded card blank. Use low tack tape to secure the die so that the die is just over the spine of the card and then put through your die cutting machine.

4. Open the die cut card out and then fold one of the panels in half remembering that the panel is not a complete circle

5. To decorate the top part of the card die cut a circle from red card using the same die you used to make the card blank. Then die cut a piece of the backing paper using a smaller circle die and a scalloped circle from red card

6. Layer the shapes together with the main ship image and then attach the panel to the front of the easel card. To make sure the panel is straight, line up the spine of the card blank with one of the lines on your cutting mat before sticking the panel to the card

7. To make the band across the front of the base, colour in the row of anchors and then cut it in to a strip. Attach this to a strip of red card and then die cut it using the circle die you used to make the base card. Attach the strip to the die positioning it where you want the strip to sit on the base. Cut it and then colour using Promarkers

8. To decorate the base of the card die cut a red circle using the die you used to make the base card. Die cut a circle of the backing paper the same size as you used to decorate the top panel.

9. Layer these circles together and then attach the anchor strip using foam pads - this will act as the stopper for the easel. Attach the second boat image using foam pads and then put Card Candi coloured with the Poppy Promarker on the anchor strip as shown in the photo below. Finish the card with a peel off greeting
Hope you like this card - don't forget to leave a comment to let me know what you think.
Have a lovely weekend (it might even be sunny!!) and don't forget there's still plenty of time to enter our current blog challenge which is 'Summer/Holidays' - you can find all the details here
Helen x


Super project Helen, and thanks for the instructions for using Digi's, very useful x
ReplyDeletefabulous card love the nautical feel
ReplyDeleteHugs Kate xx
great project. i wish all your stamps came as digis. ive got loads but would like loads more, as your designs are fab.
ReplyDelete